3.10. ROS 2 Router configuration via XML profiles
3.10.1. Background
eProsima ROS 2 Router, a.k.a DDS Router, is an end-user software application that enables the connection of distributed ROS 2 networks (see the ROS 2 Router documentation here). That is, ROS 2 nodes such as publishers and subscriptions, or clients and services, deployed in one geographic location and using a dedicated local network will be able to communicate with other ROS 2 nodes deployed in different geographic locations on their own dedicated local networks as if they were all on the same network through the use of ROS 2 Router.
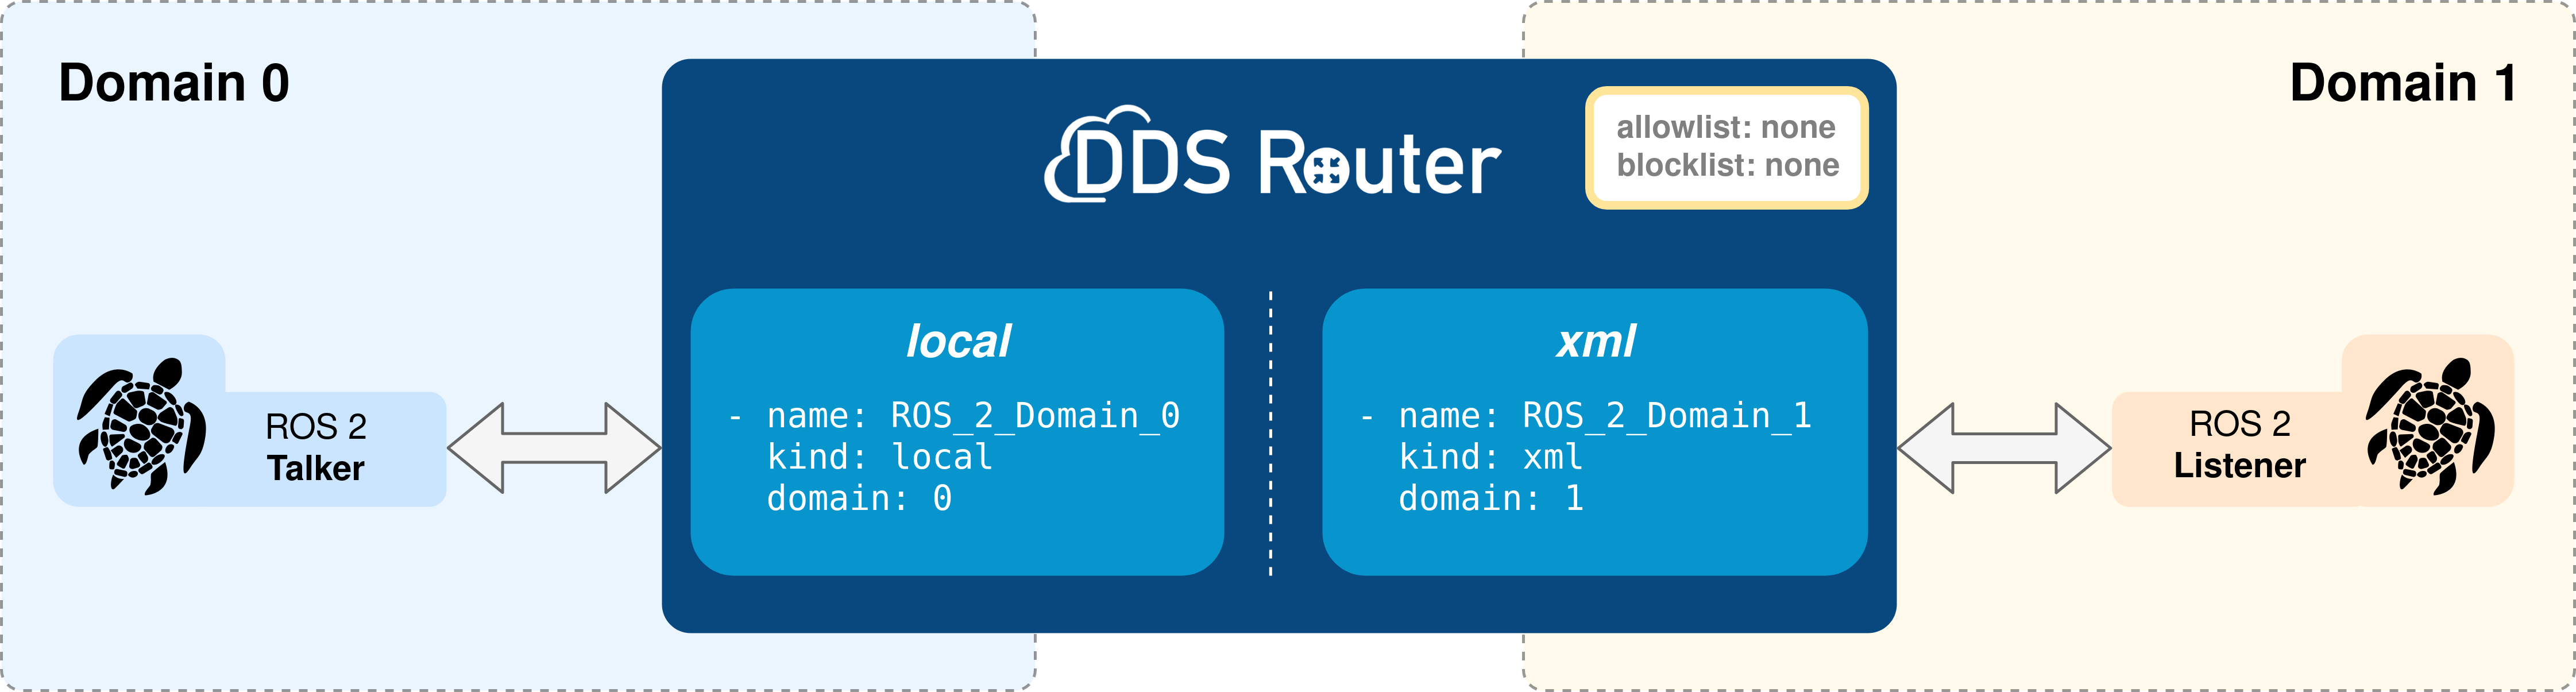
This tutorial explains how to configure a Participant with XML. In particular, we will configure two Participants, one without XML on domain 0 and one with XML on domain 1, and use the ROS 2 Router to allow them to communicate between each other.
Note
This tutorial is similar to the Change ROS 2 Domain Id tutorial, since we will launch a talker and a listener on different domains and connect them with the ROS 2 Router. The difference between both tutorials is that, in this one, one of the Participants will be configured using Fast DDS XML profiles.
The DDS protocol defines Domain Id as a parameter for every DomainParticipant. Different entities in different Domain Ids will never discover each other, and thus they will not communicate with each other. The ROS 2 Router can be used as a bridge between ROS 2 Domains, so that every node in a domain can communicate with every other node on another domain, as illustrated in the following figure:
This tutorial will use the demo_nodes_cpp package, available in the Vulcanexus Desktop distribution.
Two ROS 2 nodes, a talker and a listener, will be launched on different ROS 2 Domains, so that they cannot communicate between each other.
Then, the ROS 2 Router will be used as a bridge between the two Domains, allowing the listener to receive the messages from the talker.
3.10.2. Prerequisites
To proceed, please install Vulcanexus with one of the following installation methods:
3.10.3. Deploy ROS 2 nodes
Let us start by running the ROS 2 talker and listener nodes.
3.10.3.1. Environment setup
To run the nodes, we need to set up the Vulcanexus environment so that the demo_nodes_cpp package is available.
There are two ways to achieve this:
Running the Vulcanexus Docker image.
Run the Vulcanexus Docker image by executing:
docker run -it ubuntu-vulcanexus:iron-desktop
And then, source the Vulcanexus installation by executing (inside the container):
source /opt/vulcanexus/iron/setup.bash
Setting up a development environment on the local host.
To do this, the
vucanexus-iron-desktoppackage is needed, since it includes all the simulation tools, demos, and tutorials.Set up the Vulcanexus environment by executing:
source /opt/vulcanexus/iron/setup.bash
3.10.3.2. Running ROS 2 nodes
Run a ROS 2 demo_nodes_cpp talker on domain 0:
ROS_DOMAIN_ID=0 ros2 run demo_nodes_cpp talker
Run a ROS 2 demo_nodes_cpp listener on domain 1:
ROS_DOMAIN_ID=1 ros2 run demo_nodes_cpp listener
At this point, the listener should not receive any data from the talker since they are in different domains. To connect them, we will use the ROS 2 Router.
3.10.4. Deploy ROS 2 Router
To deploy the router, we need to create the ROS 2 Router configuration.
The following YAML configuration file configures a ROS 2 Router to create a Simple Participant on domain 0
and a Participant configured by XML on domain 1.
This configuration is similar to the one in Change ROS 2 Domain Id: it generates a bridge between two domains (0 and 1).
version: v3.1

xml:
  files:
    - "./xml_configuration.xml"
  raw: |
    <?xml version="1.0" encoding="UTF-8" ?>
    <profiles xmlns="http://www.eprosima.com/XMLSchemas/fastRTPS_Profiles" >
        <participant profile_name="custom_participant_configuration">
            <domainId>1</domainId>
            <rtps></rtps>
        </participant>
    </profiles>

participants:

  - name: ROS_2_Domain_0
    kind: local
    domain: 0

  - name: ROS_2_Domain_1
    kind: xml
    profile: custom_participant_configuration
3.10.4.1. Participant XML Configuration
ROS 2 Router supports loading XML configuration files to load profiles. These profiles are used to configure different DomainParticipants using profile names. Loading an XML file or setting the raw xml file in the DDS Router YAML configuration file allows to load such profiles. Here there are the two ways to load them. For more information check the Load XML Configuration <https://eprosima-dds-router.readthedocs.io/en/latest/rst/user_manual/configuration.html#user-manual-configuration-load-xml>.
xml:
  files:
    - "./xml_configuration.xml"
  raw: |
    <?xml version="1.0" encoding="UTF-8" ?>
    <profiles xmlns="http://www.eprosima.com/XMLSchemas/fastRTPS_Profiles" >
        <participant profile_name="custom_participant_configuration">
            <domainId>1</domainId>
            <rtps></rtps>
        </participant>
    </profiles>
3.10.4.2. Simple Participant Domain 0
The Simple Participant is configured with a name, a kind, and a domain id (0 in this case).
  - name: ROS_2_Domain_0
    kind: local
    domain: 0
3.10.4.3. XML Participant Domain 1
The XML Participant is configured with a name, a kind, and an XML profile tag that will be used to configure it.
The XML configures the profile custom_participant_configuration as a default Participant on domain 1, so this Participant will run as a local participant on domain 1.
  - name: ROS_2_Domain_1
    kind: xml
    profile: custom_participant_configuration
3.10.4.4. Running ROS 2 Router
Run the DDS Router with the configuration file available at <path/to/file>/ros_2_router_xml_config.yaml.
ddsrouter --config-path <path/to/file>/ros_2_router_xml_config.yaml
The output from the ROS 2 Router should be something like:
Starting DDS Router Tool execution.
DDS Router running.
If so, the ROS 2 Router has started correctly and it is currently running. Once the DDS Router is running, it will forward the messages from the talker on domain 0 to the listener on domain 1.
In order to close the execution, press ^C or send a signal (SIGINT 2 or SIGTERM 15) to close it.