3.1. Change ROS 2 Domain Id
3.1.1. Background
eProsima ROS 2 Router, a.k.a DDS Router, is an end-user software application that enables the connection of distributed ROS 2 networks (see ROS 2 Router documentation here). That is, ROS 2 nodes such as publishers and subscriptions, or clients and services, deployed in one geographic location and using a dedicated local network will be able to communicate with other ROS 2 nodes deployed in different geographic areas on their own dedicated local networks as if they were all on the same network through the use of ROS 2 Router.
This tutorial explains how to use the ROS 2 Router to communicate ROS 2 nodes in different Domain Ids. The DDS protocol defines Domain Id as a parameter for every DomainParticipant. Different entities in different Domain Ids will never discover each other, and thus they will not communicate with each other. Using the ROS 2 Router as a bridge between ROS 2 Domains, every node will be able to communicate with any other node independently of the Domain where they are deployed.
As already mentioned, the approach of this tutorial is straightforward and is illustrated in the following figure:

This tutorial will use the demo_nodes_cpp package, available in the Vulcanexus Desktop distribution.
First, a ROS 2 talker is launched and then a listener node is started in a different ROS 2 Domain.
This will prevent the two from communicating.
At this point, the ROS 2 Router will be deployed as a bridge between the two Domains and will enable the talker-listener communication.
3.1.2. Prerequisites
It is required to have previously installed Vulcanexus using one of the following installation methods:
3.1.3. Deploy ROS 2 nodes
First let’s run the ROS 2 talker and listener nodes.
3.1.3.1. Environment setup
Setup the Vulcanexus environment to have the demo_nodes_cpp package available.
For this, there are two possible options:
Running the Vulcanexus Docker image.
Run the Vulcanexus Docker image with:
docker run -it ubuntu-vulcanexus:humble-desktop
Then, within the container, source the Vulcanexus installation with:
source /opt/vulcanexus/humble/setup.bash
Setting up the development environment on the local host. For this second option, it is necessary to have installed the
vucanexus-humble-desktoppackage, since this is the one that includes all the simulation tools, demos and tutorials.Source the following file to setup the Vulcanexus environment:
source /opt/vulcanexus/humble/setup.bash
3.1.3.2. Running ROS 2 nodes
Once the environment has been setup using one of the above options, run the ROS 2 talker node in one terminal.
ros2 run demo_nodes_cpp talker
Then, on another terminal, run the ROS 2 listener node in ROS 2 Domain 1.
ROS_DOMAIN_ID=1 ros2 run demo_nodes_cpp listener
At this point, the listener should not receive any data.
If not, please go again through the previous steps.
3.1.4. Deploy ROS 2 Router
Then, create the ROS 2 Router configuration file as the one shown below.
Note
There is an available configuration file in DDS Router repository.
Note
If deploying Vulcanexus from the Docker image, note that you will need to have a configuration file (config.yaml) for the ROS 2 Router Edge accessible from your Docker container. This can be achieved by mounting a shared volume when launching the container, by copying the file from the local host to the container in case it is already running, or by editing a file from the Docker container itself.
version: v3.1

participants:

  - name: ROS_2_Domain_0
    kind: local
    domain: 0

  - name: ROS_2_Domain_1
    kind: local
    domain: 1
This configuration defines 2 different Router Participants, internal “interfaces” for the ROS 2 Router. Each of this Participants will create DDS Entities in each of the domains, and they will forward all the data received from one Domain to the other. Topics, Data Types, Quality of Services and the order of messages will be respected when redirecting the data.
3.1.4.1. Running ROS 2 Router
Now, run the ROS 2 Router with the configuration file created as an argument.
ddsrouter --config-path <path/to/file>/change_domain.yaml
At this point you should see some information like the one shown below. This indicates that the ROS 2 Router has started correctly and it is currently running.
Starting DDS Router Tool execution.
DDS Router running.
In order to close the execution, just press ^C or send a signal (SIGINT 2 or SIGTERM 15) to close it.
3.1.5. Communicating multiple Domains
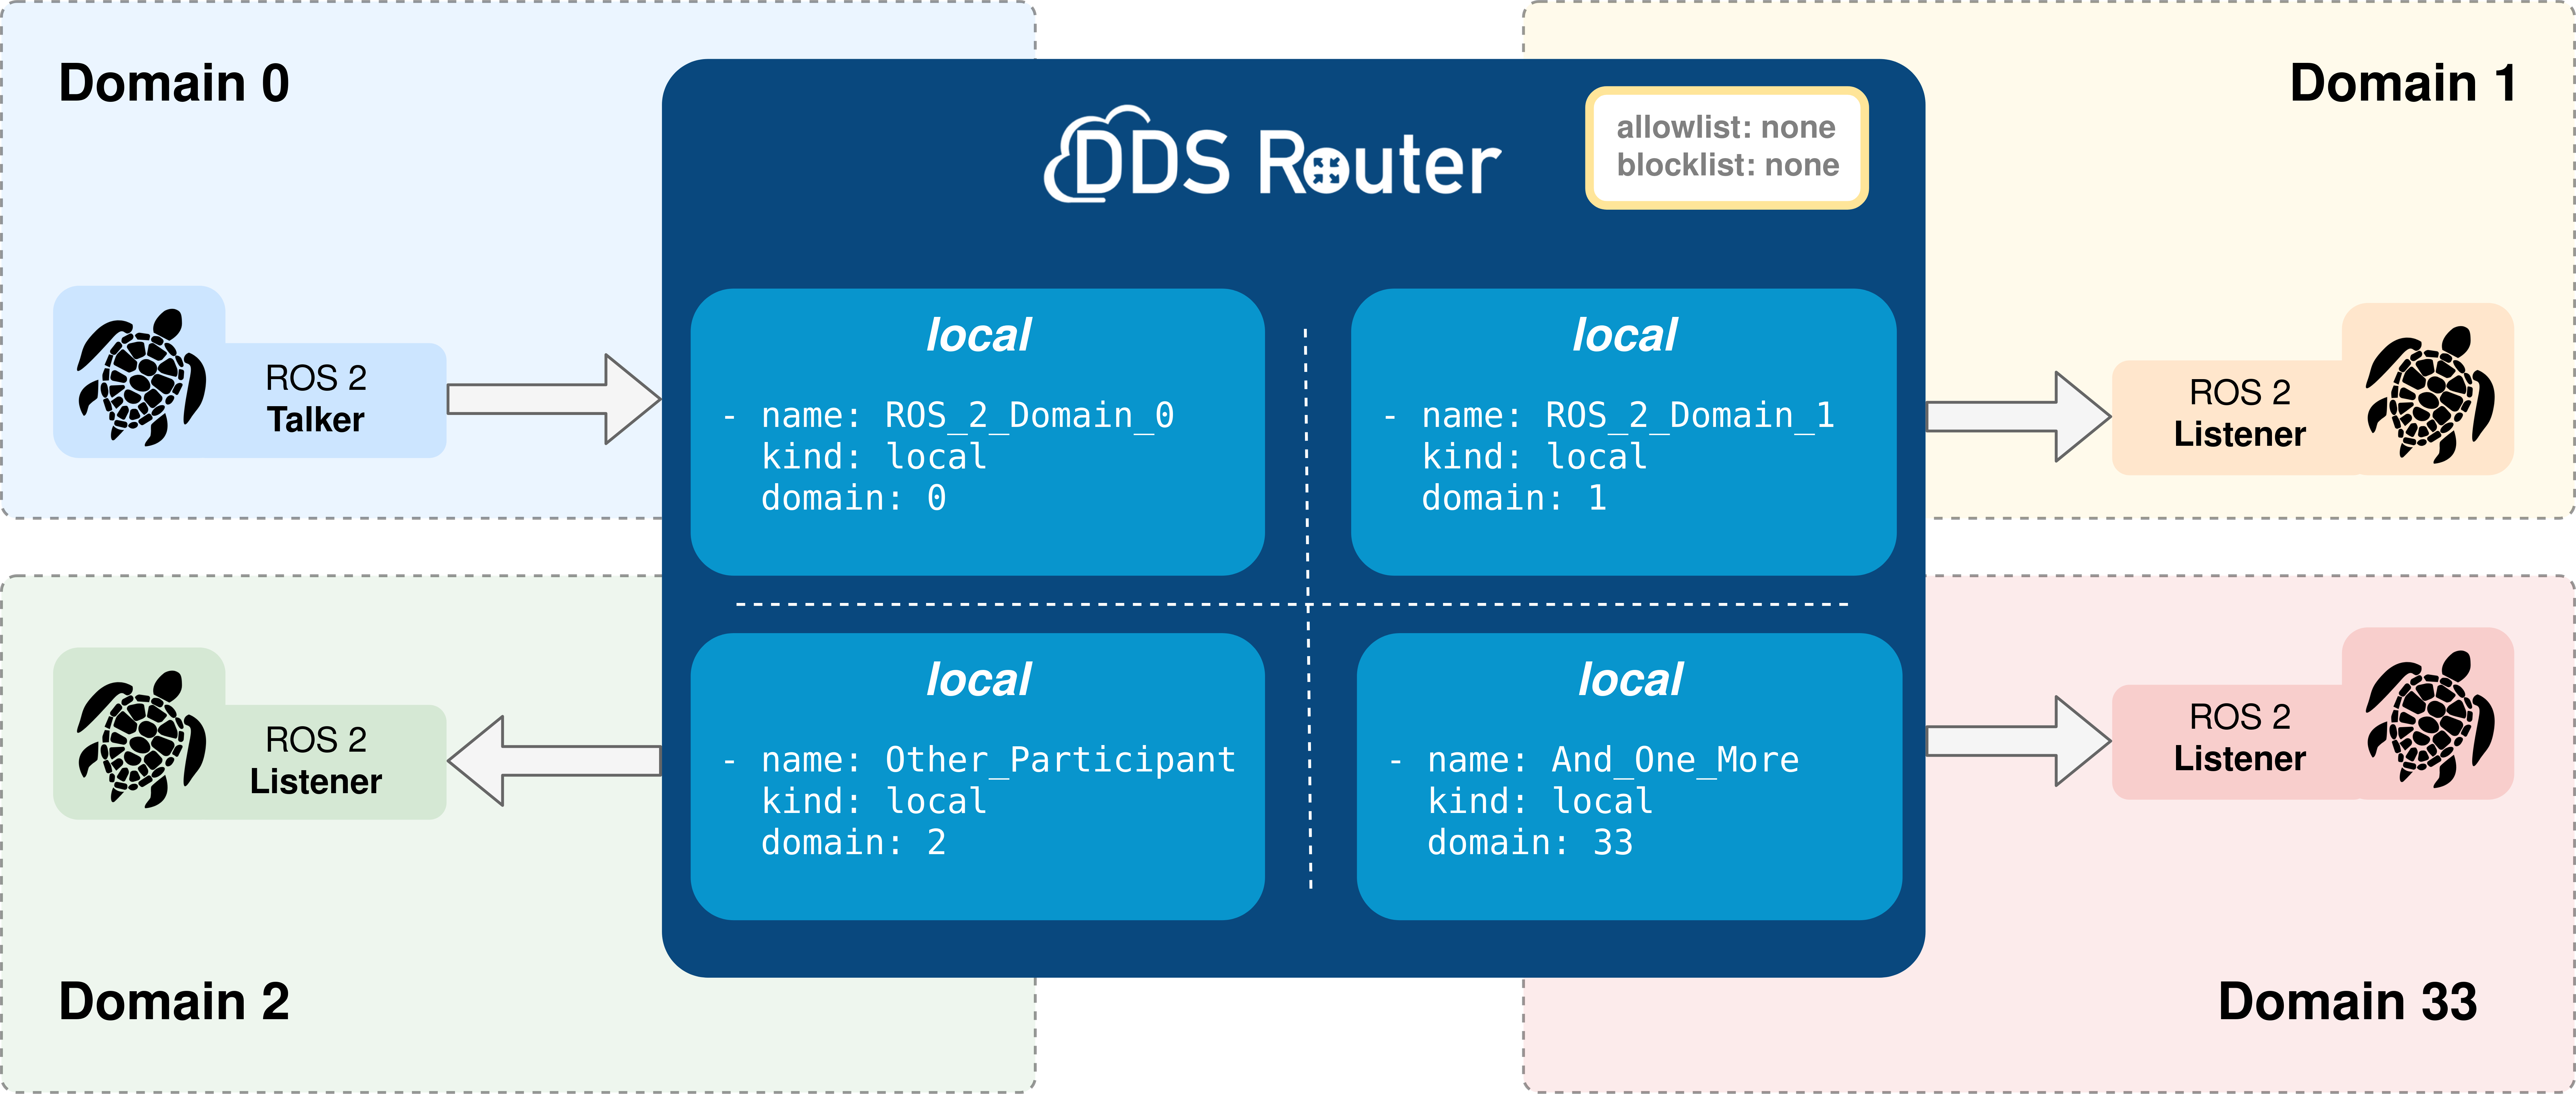
The ROS 2 Router can equally inter-communicate 2 or more Domain Ids. Just add as many Participants as desired to the configuration file and this will redirect all messages from every Domain to all the others. The following figure illustrates the use case and the configuration required to communicate four different Domains.

version: v3.1

participants:

  - name: ROS_2_Domain_0
    kind: local
    domain: 0

  - name: ROS_2_Domain_1
    kind: local
    domain: 1

  - name: Other_ROS_2_Participant
    kind: local
    domain: 2

  - name: And_One_More
    kind: local
    domain: 33