2.2. Getting Started with Fast DDS Spy
2.2.1. Background
Vulcanexus integrates eProsima Fast DDS Spy, an interactive command-line tool that allows you to inspect DDS entities such as DomainParticipants, DataWriters, DataReaders, topics, and live user data in a human-readable format. Since ROS 2 relies on the DDS specification for communication between nodes, Fast DDS Spy is a useful tool for observing an existing DDS system and understanding what entities and data are visible.
This tutorial explains how to use Fast DDS Spy to inspect a running DDS network step by step. By the end of this tutorial, you will be able to:
Start a simple DDS scenario using ShapesDemo.
Launch Fast DDS Spy.
Discover DDS DomainParticipants.
List DataWriters and DataReaders.
List active DDS topics.
Inspect topic information.
Display the IDL/type information of a topic.
Echo live topic data from the DDS network.
2.2.2. Prerequisites
Ensure that the Vulcanexus installation includes Vulcanexus Tools (either vulcanexus-kilted-desktop, vulcanexus-kilted-tools, or vulcanexus-kilted-base).
Also, remember to source the environment in every terminal in this tutorial.
source /opt/vulcanexus/kilted/setup.bash
In addition, you will need a DDS application publishing data. In this tutorial, ShapesDemo is used. Both ShapesDemo and Fast DDS Spy must be running in the same DDS domain.
Note
Fast DDS Spy can also be installed as a standalone tool. See the Fast DDS Spy documentation for alternative installation options.
2.2.3. Scenario Overview
In this tutorial, ShapesDemo publishes data on a DDS topic, and Fast DDS Spy is used to inspect what is happening in the DDS network.
ShapesDemo publisher
     |
     v
DDS network
     |
     v
Fast DDS Spy
The goal is to observe an existing DDS system and understand what entities and data are visible, not to create a publisher or subscriber from scratch.
2.2.4. Step 1: Start ShapesDemo
Open ShapesDemo in a terminal:
ShapesDemo
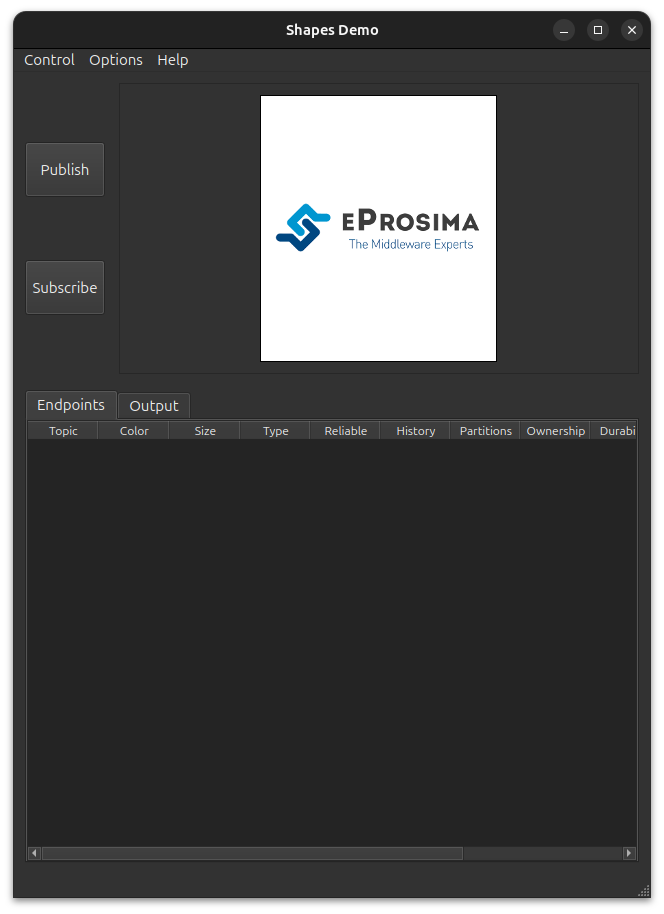
You should see the ShapesDemo application open.
2.2.4.1. Configure the participant
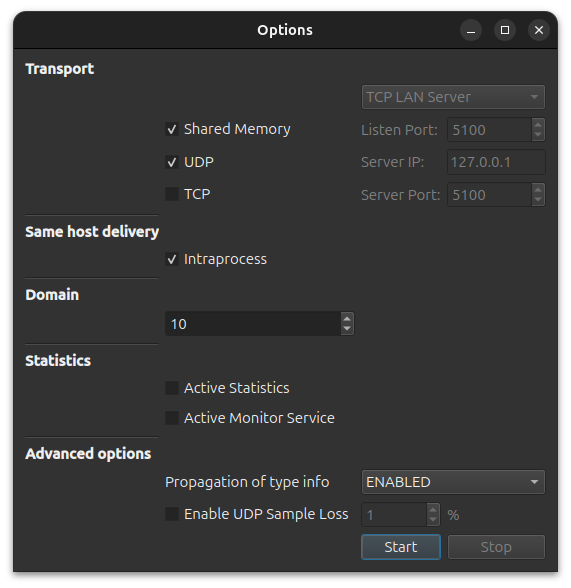
In the toolbar at the top, open the Options menu and select Participant Configuration.
This window lets you choose the transport mode, Domain ID, and other advanced options.
In this tutorial, set the Domain ID to 10.
Note
In this tutorial, the statistics option is left unchecked. Once you have completed the tutorial, you can try running the demo again with statistics enabled and observe the differences.
You should see a small banner under the app indicating Participant ready in domainId 10.
2.2.4.2. Run the publisher and the subscriber
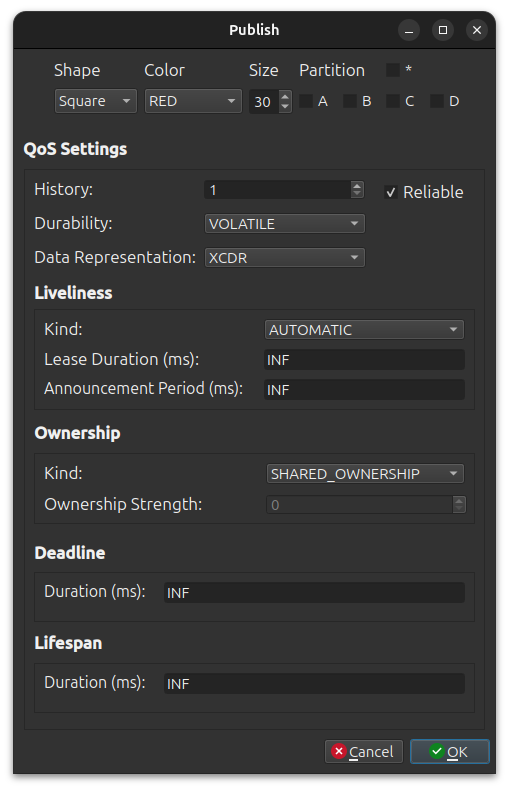
Click the Publish button and, in the pop-up menu, select the Square shape, the RED color, and a size of 30,
then click OK.
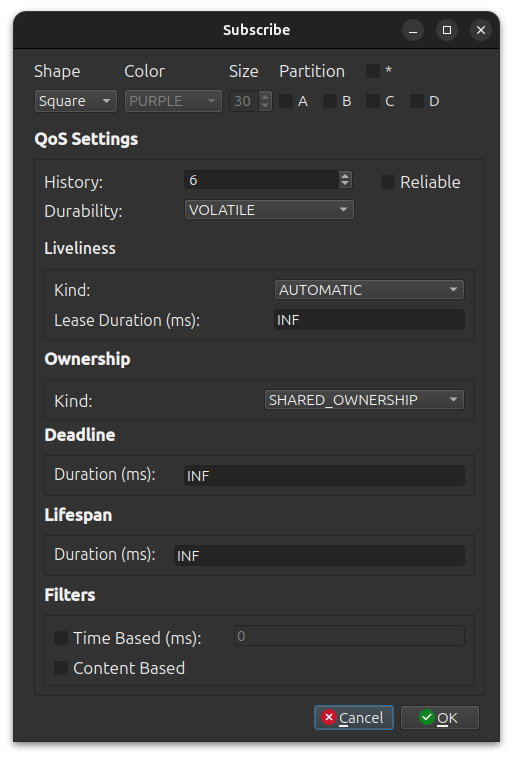
Once ShapesDemo starts publishing the squares, create the subscriber. Click the Subscribe button and
select the Square shape.
You should now see ShapesDemo running and publishing square samples.
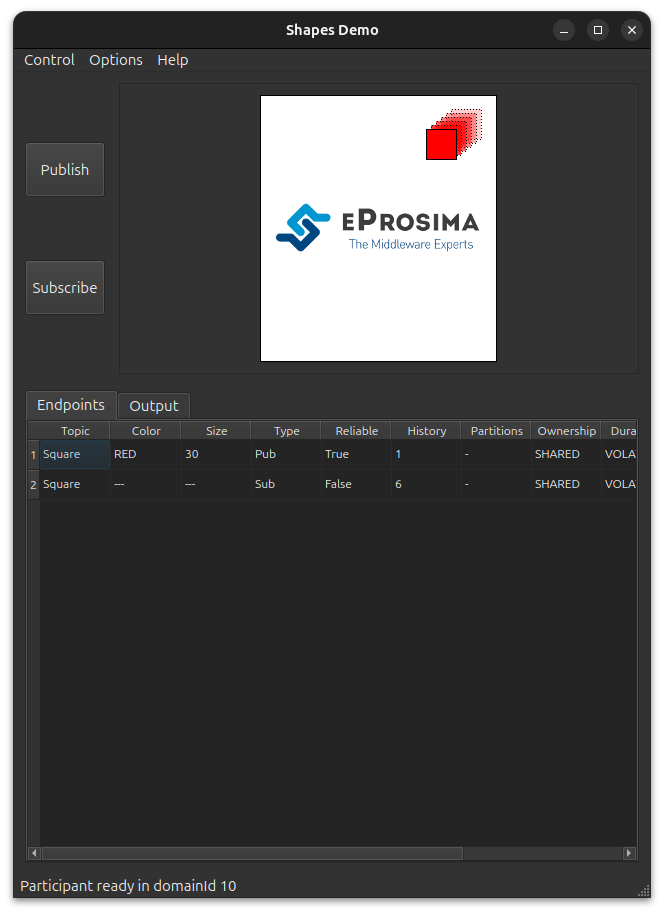
There is now an active DDS DataWriter publishing data on the Square topic as well as a DataReader receiving it.
Fast DDS Spy will later discover these entities and the topic they communicate on.
2.2.5. Step 2: Launch Fast DDS Spy
Open a new terminal and launch Fast DDS Spy:
source /opt/vulcanexus/kilted/setup.bash
fastddsspy --domain 10
Note
The default Domain ID is 0, so the --domain option is used to switch to domain 10,
where ShapesDemo is publishing.
Fast DDS Spy should start and display an interactive prompt.
 ____|             |        __ \   __ \    ___|        ___|
 |     _` |   __|  __|      |   |  |   | \___ \      \___ \   __ \   |   |
 __|  (   | \__ \  |        |   |  |   |       |           |  |   |  |   |
_|   \__,_| ____/ \__|     ____/  ____/  _____/      _____/   .__/  \__, |
                                                              _|     ____/


Insert a command for Fast DDS Spy:
>>
Fast DDS Spy is running and ready to receive commands. It will automatically discover DDS entities available in the configured domain.
2.2.7. Step 4: Discover DomainParticipants
Run:
participants
You should see at least one discovered DomainParticipant related to ShapesDemo. The output includes the participant name and its GUID.
>> participants
- name: Fast DDS ShapesDemo Participant
  guid: 01.0f.91.a5.1f.00.1c.08.00.00.01.00|0.0.1.c1
Fast DDS Spy has discovered at least one DDS participant in the network, confirming that discovery is working.
Note
If no participants appear, check that ShapesDemo is still running, that both applications use the same DDS domain, and that your network configuration allows DDS discovery. Wait a few seconds and run the command again.
2.2.7.1. Verbose output
Use the verbose option to check more detailed information, including endpoints and the topics they are associated with.
participants verbose
>> participants verbose
- name: Fast DDS ShapesDemo Participant
  guid: 01.0f.91.a5.1f.00.1c.08.00.00.01.00|0.0.1.c1
  datawriters:
    - Square [ShapeType] (1)
  datareaders:
    - Square [ShapeType] (1)
2.2.8. Step 5: Discover DataWriters
Run:
writers
You should see one DataWriter associated with the Square topic.
>> writers
- guid: 01.0f.91.a5.1f.00.1c.08.00.00.01.00|0.0.1.2
  participant: Fast DDS ShapesDemo Participant
  topic: Square [ShapeType]
A DataWriter is a DDS entity that publishes data. Seeing a writer associated with Square confirms that Fast DDS Spy can discover the publisher side of the DDS communication.
2.2.8.1. Verbose output
Running the command with the verbose option shows more information about the topic and its QoS.
writers verbose
>> writers verbose
- guid: 01.0f.91.a5.1f.00.1c.08.00.00.01.00|0.0.1.2
  participant: Fast DDS ShapesDemo Participant
  topic:
    name: Square
    type: ShapeType
    partitions: ""
  qos:
    durability: volatile
    reliability: reliable
2.2.9. Step 6: Discover DataReaders
Run:
readers
You should see one DataReader associated with the Square topic.
>> readers
- guid: 01.0f.91.a5.1f.00.1c.08.00.00.01.00|0.0.2.7
  participant: Fast DDS ShapesDemo Participant
  topic: Square [ShapeType]
A DataReader is a DDS entity that subscribes to data. Seeing a reader associated with the Square topic confirms that Fast DDS Spy can discover the subscriber side of the communication.
2.2.9.1. Verbose output
Running this command with the verbose option shows more detailed information about the reader’s topic and QoS.
readers verbose
>> readers verbose
- guid: 01.0f.91.a5.1f.00.1c.08.00.00.01.00|0.0.2.7
  participant: Fast DDS ShapesDemo Participant
  topic:
    name: Square
    type: ShapeType
    partitions: ""
  qos:
    durability: volatile
    reliability: best-effort
2.2.10. Step 7: List DDS Topics
Run:
topics
You should see the active topics discovered in the DDS network.
>> topics
- topic: Square (ShapeType) (1|1) [13.334426 Hz]
Fast DDS Spy has discovered the topic names used by the DDS network. Listing topics is usually the first command to run when you want to understand what data is available.
2.2.11. Step 8: Inspect a Topic in Detail
Run:
topics Square v
The verbose output includes the topic name, type, associated DataWriters and DataReaders, publication rate, and type discovery information.
>> topics Square v
- name: Square
  type: ShapeType
  datawriters: 1
  datareaders: 1
  rate: 13.3329 Hz
For more detailed output, run:
topics Square vv
The results include the GUIDs of the associated DataWriters and DataReaders, as well as their partitions.
>> topics Square vv
- name: Square
  type: ShapeType
  datawriters:
    - 01.0f.91.a5.1f.00.1c.08.00.00.01.00|0.0.1.2 [""]
  datareaders:
    - 01.0f.91.a5.1f.00.1c.08.00.00.01.00|0.0.2.7 [""]
  rate: 13.3355 Hz
  dynamic_type_discovered: true
2.2.12. Step 9: Display the Topic IDL
Run:
topics Square idl
Fast DDS Spy will display the IDL/type definition associated with the Square topic.
>> topics Square idl

@extensibility(APPENDABLE)
struct ShapeType
{
    @key string color;
    long x;
    long y;
    long shapesize;
};
The IDL output shows the structure of the data being published. This helps you understand what fields will appear when live data is echoed.
2.2.13. Step 10: Echo Live Topic Data
Run:
echo Square
Fast DDS Spy will print live samples published on the Square topic.
>> echo Square
---
{
    "color": "RED",
    "shapesize": 30,
    "x": 141,
    "y": 164
}
---

---
{
    "color": "RED",
    "shapesize": 30,
    "x": 135,
    "y": 159
}
---
The exact values will change while ShapesDemo is running. Press Enter to stop printing live data and return to the Fast DDS Spy prompt.
For more detailed output, including topic name and type, writer GUID, partitions, and a timestamp, run:
echo Square verbose
The output will include additional information about the source of the data and the time it was received.
>> echo Square verbose
topic: Square [ShapeType]
writer: 01.0f.bc.7a.1f.00.59.d1.00.00.00.00|0.0.1.2
partitions: ""
timestamp: 2026/06/08 06:12:53
data:
---
{
    "color": "RED",
    "shapesize": 30,
    "x": 94,
    "y": 65
}
---

topic: Square [ShapeType]
writer: 01.0f.bc.7a.1f.00.59.d1.00.00.00.00|0.0.1.2
partitions: ""
timestamp: 2026/06/08 06:12:53
data:
---
{
    "color": "RED",
    "shapesize": 30,
    "x": 89,
    "y": 59
}
---
Fast DDS Spy is now reading and displaying user data from the DDS network. This confirms that the topic data type was discovered and that live samples are being received.
2.2.14. Step 11: Exit Fast DDS Spy
Run:
quit
Fast DDS Spy will close and return you to the normal terminal prompt.
2.2.15. Optional: Use a YAML Configuration File
Fast DDS Spy can be configured using a YAML file. This is useful when you want to change the DDS domain, configure transports, or filter topics.
A minimal configuration example:
dds:
  domain: 10
You can also use topic filters to focus only on specific topics:
topics:
  allowlist:
    - name: Square
Note
See the Fast DDS Spy configuration documentation for the complete YAML schema supported by your version.
2.2.16. Next Steps
After completing this tutorial, you can continue with:
Running Fast DDS Spy with a YAML configuration file.
Filtering topics with allowlists or blocklists.
Inspecting a real ROS 2 application instead of ShapesDemo.
Using Fast DDS Spy as part of a debugging or validation workflow.
Visit eProsima Fast DDS Spy Documentation for more information on how to configure and use Fast DDS Spy.