2.6. Hand-on ROS 2 Shapes Demo
2.6.1. Background
Vulcanexus integrates ROS 2 Shapes Demo, which is a useful application for learning the capabilities of DDS or as a proof of eProsima Fast DDS interoperability with other DDS-compliant implementations.
2.6.2. Prerequisites
It is required to have previously installed Vulcanexus using one of the following installation methods:
Ensure that the Vulcanexus installation includes Vulcanexus Tools (either vulcanexus-kilted-desktop, vulcanexus-kilted-tools, or vulcanexus-kilted-base).
Run Vulcanexus Docker image with:
xhost local:root
docker run \
    -it \
    --privileged \
    -e DISPLAY=$DISPLAY \
    -v /tmp/.X11-unix:/tmp/.X11-unix \
    ubuntu-vulcanexus:kilted-desktop
To run more than one session within the same container, Vulcanexus installation must be sourced. Given a running container, you can open another session by:
docker exec -it <running-container-id> bash
Then, within the container, source the Vulcanexus installation with:
source /opt/vulcanexus/kilted/setup.bash
2.6.3. Launch ROS 2 Shapes Demo
Initiate ROS 2 Shapes Demo running the following command:
shapesdemo
Warning
Please verify that you are running the ROS 2 Shapes Demo version. To check this simply verify that the Vulcanexus banner is displayed in the background of the main box. If the eProsima logo appears instead, activate the ROS 2 version in Options > Participant Configuration > Use ROS 2 Topics.
2.6.4. Learning DDS capabilities
This tutorials present step-by-step instructions to test the functionalities provided by DDS thought the ROS 2 Shapes Demo application.
2.6.4.1. Discovery and basic connectivity
In Fast DDS, the discovery task is automatic. Fast DDS performs the task of finding the relevant information and distributing it to its destination. It means that new nodes are automatically discovered by any other in the network. Please refer to the Fast DDS Discovery Documentation for more information on the various Fast DDS discovery mechanisms.
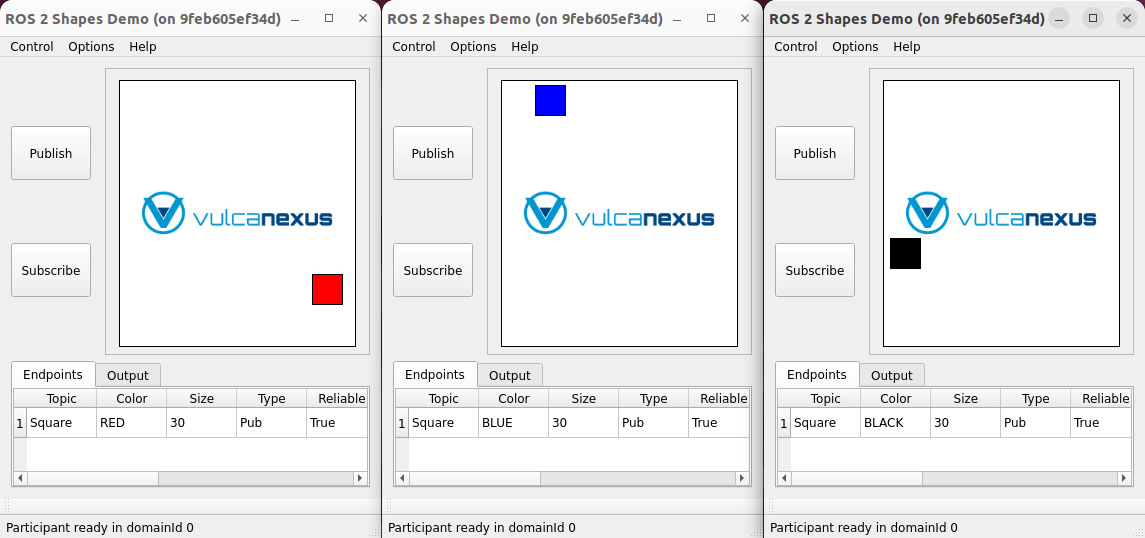
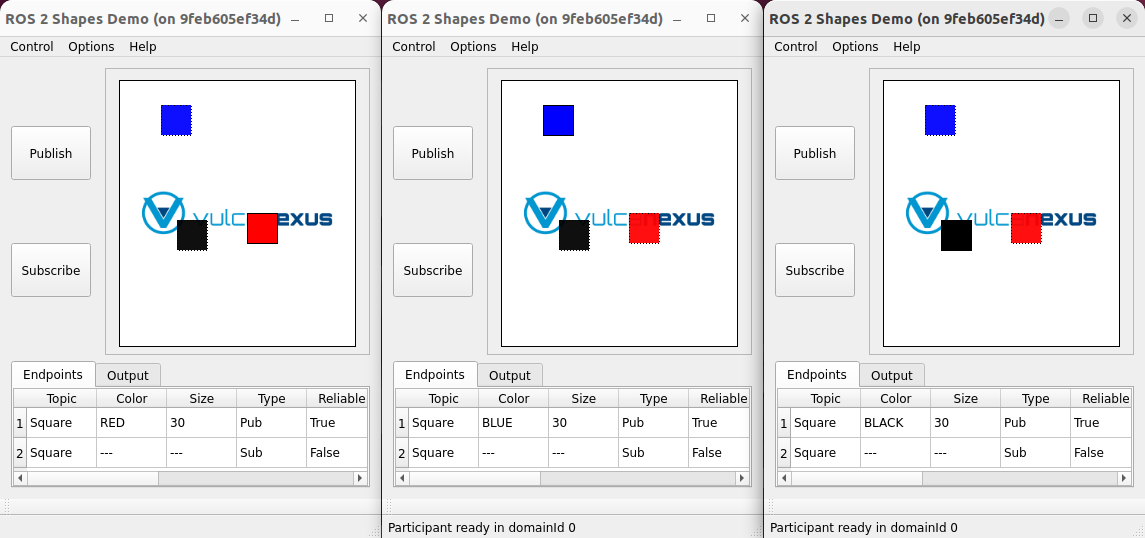
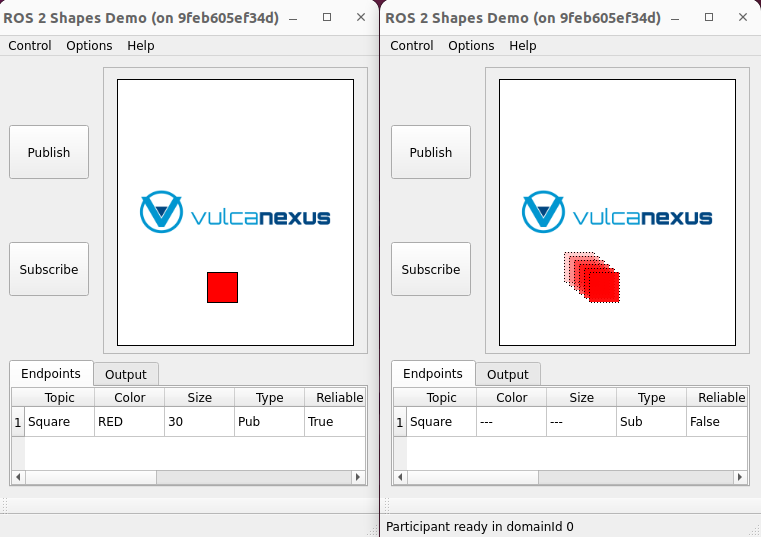
In this test, three Publishers and three Subscribers are launched. At the end, two additional squares will be displayed in each window, reflecting the movements of the original square in real time. That is, subscribers subscribing to the “Square” topics are matched with the publishers of the other instances.
First, three publishers must be created.
Create a red square publisher:
Start ROS 2 Shapes Demo (this instance will be referred to as Instance1).
Click on Publish.
Select SQUARE option for Shape and RED for Color.
Create a blue square publisher:
Start ROS 2 Shapes Demo (this instance will be referred to as Instance2).
Click on Publish.
Select SQUARE option for Shape and BLUE for Color.
Create a black square publisher:
Start ROS 2 Shapes Demo (this instance will be referred to as Instance3).
Click on Publish.
Select SQUARE option for Shape and BLACK for Color.
The current setting should be similar to that shown in the figure below.
Then, three subscribers must be created.
Click Subscribe on Instance1.
Select SQUARE option for Shape.
Change the History field from 6 to 1.
Click Subscribe on Instance2.
Select SQUARE option for Shape.
Change the History field from 6 to 1.
Click Subscribe on Instance3.
Select SQUARE option for Shape.
Change the History field from 6 to 1.
The ROS 2 Shapes Demo windows should look similar to the following image.
2.6.4.2. History and Durability
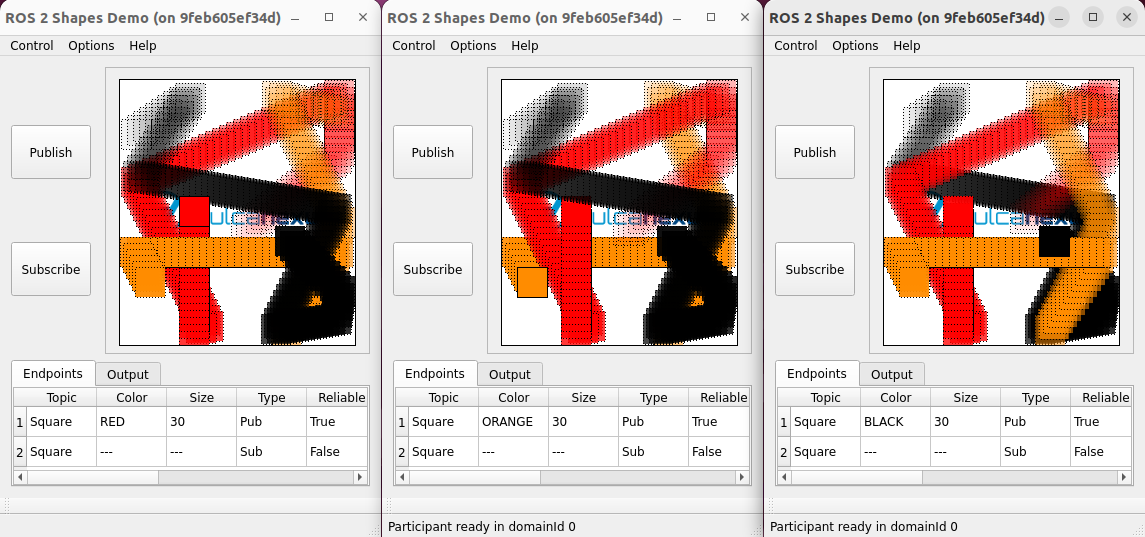
A publisher can send messages throughout a Topic even if there are no DataReaders on the network. Moreover, a DataReader that joins to the Topic after some data has been written could be interested in accessing that information. The durability defines how the system will behave regarding those samples that existed on the Topic before the subscriber joins. Please refer to Fast DDS DurabilityQosPolicy Documentation for more information on Durability QoS.
In the following example, the publishers’ history is set to KEEP_LAST, and
there are two options for the durability configuration which are VOLATILE and TRANSIENT_LOCAL.
If VOLATILE is selected, the previous data samples will not be sent.
However, if TRANSIENT_LOCAL is selected, the \(n^{th}\) previous data samples will be sent to the late-joining
subscriber.
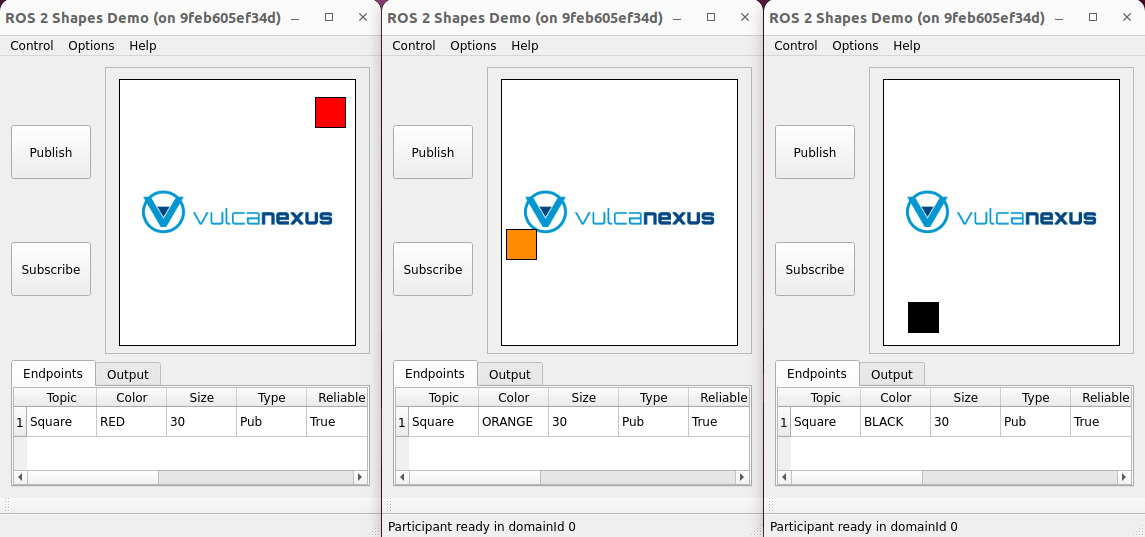
In this example, one hundred red squares will be displayed in Instance2 and Instance3, reflecting the movements of the red square of the publisher from Instance1. The leading square indicates the current position of the published square.
First, three instances are launched and a publisher is created in each of them:
1 - Create a red square publisher:
Start ROS 2 Shapes Demo (this instance will be referred to as Instance1).
Click on Publish.
Select SQUARE option for Shape and RED for Color.
Change the History field from 6 to 100.
Select TRANSIENT_LOCAL.
2 - Create an orange square publisher:
Start ROS 2 Shapes Demo (this instance will be referred to as Instance2).
Click on Publish.
Select SQUARE option for Shape and ORANGE for Color.
Change the History field from 6 to 100.
Select TRANSIENT_LOCAL.
3 - Create a black square publisher:
Start ROS 2 Shapes Demo (this instance will be referred to as Instance3).
Click on Publish.
Select SQUARE option for Shape and BLACK for Color.
Change the History field from 6 to 100.
Select TRANSIENT_LOCAL.
The ROS 2 Shapes Demo environment should look similar to the following figure.
Then, subscriber in each instance is created.
Click Subscribe on Instance1.
Select SQUARE option for Shape.
Change the History field from 6 to 100.
Click Subscribe on Instance2.
Select SQUARE option for Shape.
Change the History field from 6 to 100.
Click Subscribe on Instance3.
Select SQUARE option for Shape.
Change the History field from 6 to 100.
The ROS 2 Shapes Demo environment should look similar to the following figure.
2.6.4.3. Liveliness
The Liveliness QoS can be used to ensure whether specific entities are alive or not.
There are three values to specify the liveliness’ kind: AUTOMATIC, MANUAL_BY_PARTICIPANT or MANUAL_BY_TOPIC
liveliness.
If any of the first two is selected, a value for the lease duration and announcement period can be set.
However, if MANUAL_BY_TOPIC is selected, only the lease duration can be configured, as the announcement period is
not used with this configuration.
With the AUTOMATIC liveliness kind, the service takes the responsibility for renewing the timer associated to the
lease duration, and as long as the remote participant keeps running and remains connected, all the entities within that
participant will be considered alive.
The other two kinds (MANUAL_BY_PARTICIPANT and MANUAL_BY_TOPIC) need a periodic assertion to consider the remote
participants as alive.
Please refer to
Fast DDS LivelinessQosPolicy Documentation
for more information on Liveliness QoS.
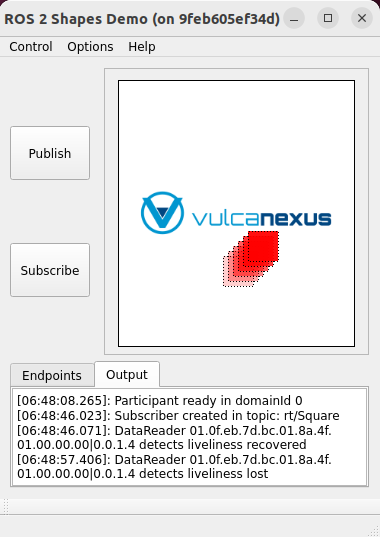
In this test, a publisher and subscriber using AUTOMATIC liveliness will be created, and a lease duration value
higher than the write rate of the publisher will be set.
First, launch two instances and create a publisher and a subscriber:
Create a red square publisher:
Start ROS 2 Shapes Demo. (We will refer to this instance as Instance1)
Click on Publish.
Select SQUARE option for Shape and RED for Color.
Select
AUTOMATICfor liveliness kind.Set Lease Duration to 150. (The default write rate is 75 ms)
Set Announcement Period to 140.
Create a square subscriber:
Start ROS 2 Shapes Demo. (We will refer to this instance as Instance2)
Click on Subscribe.
Select SQUARE option for Shape.
Select
AUTOMATICfor liveliness kind.Set a value for the Lease Duration higher or equal to the one stated for the publisher. (If the value of subscriber lease duration is lower the entities do not match)
The Output Tab of Instance2 shows that the subscriber has recovered the liveliness once it matches with the publisher.
Then, kill the process corresponding to the publisher (Instance1). As a result, the subscriber reported that liveliness was lost, as the publisher did not terminate cleanly.
2.6.4.4. Content Based Filter
In Fast DDS, the data available to the subscriber can be restricted to control network and CPU usage. The Content Based Filter can be checked when a new subscriber is deployed. This filter draws a shaded region in the instance windows. Only the samples that are covered by the shade will be available to the subscriber. This region can be resized and moved dynamically.
In this test, two Publishers and two subscriber will be created, one of the latter with Content Based.
First, you have to launch two instances and create a Publisher in each of them:
Create a red square publisher:
Start ROS 2 Shapes Demo (this instance will be referred to as Instance1).
Click on Publish.
Select SQUARE option for Shape and RED for Color.
Change the History field from 6 to 1.
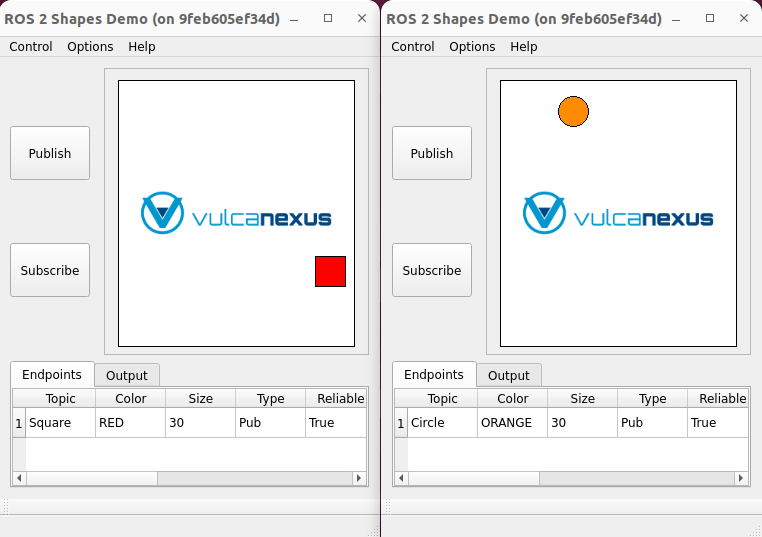
Create an orange circle publisher:
Start ROS 2 Shapes Demo (this instance will be referred to as Instance2).
Click on Publish.
Select CIRCLE option for Shape and ORANGE for Color.
Change the History field from 6 to 1.
Your windows should look similar to the following image.
Then, create two subscribers:
Create a circle subscriber:
Start ROS 2 Shapes Demo (this instance will be referred to as Instance3).
Click on Subscribe.
Select CIRCLE option for Shape.
Change the History field from 6 to 1.
Check Content Based.
Create a square subscriber:
Click on Subscribe in Instance3.
Select SQUARE option for Shape.
Change the History field from 6 to 1.
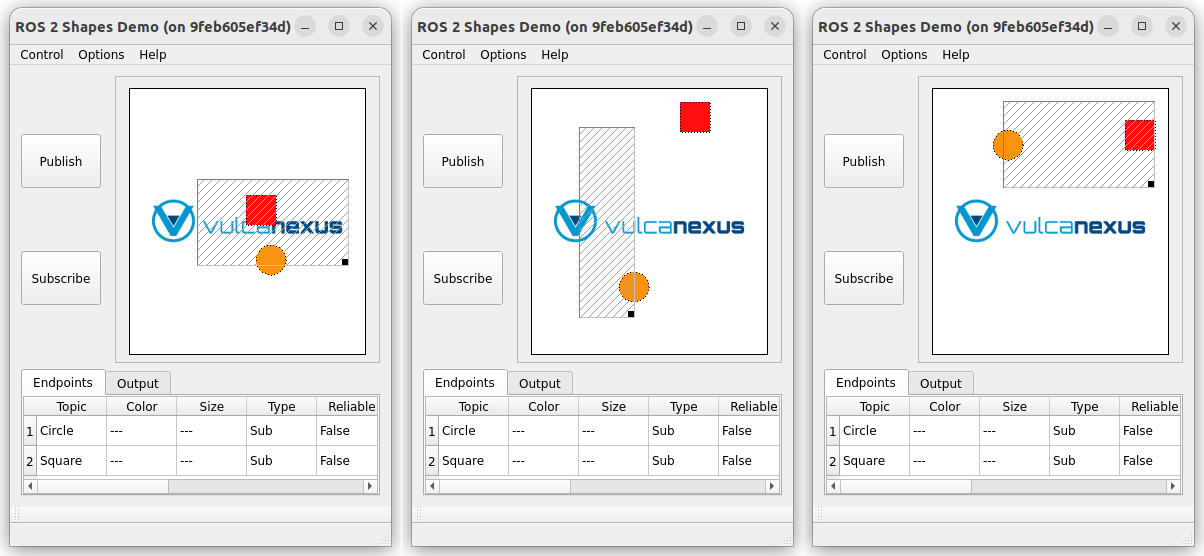
In the following figure, a shaded rectangle in Instance3 is shown. This is the filter for the samples of the Circle Shape. If the circle is out of the rectangle, it is not available for the subscriber.
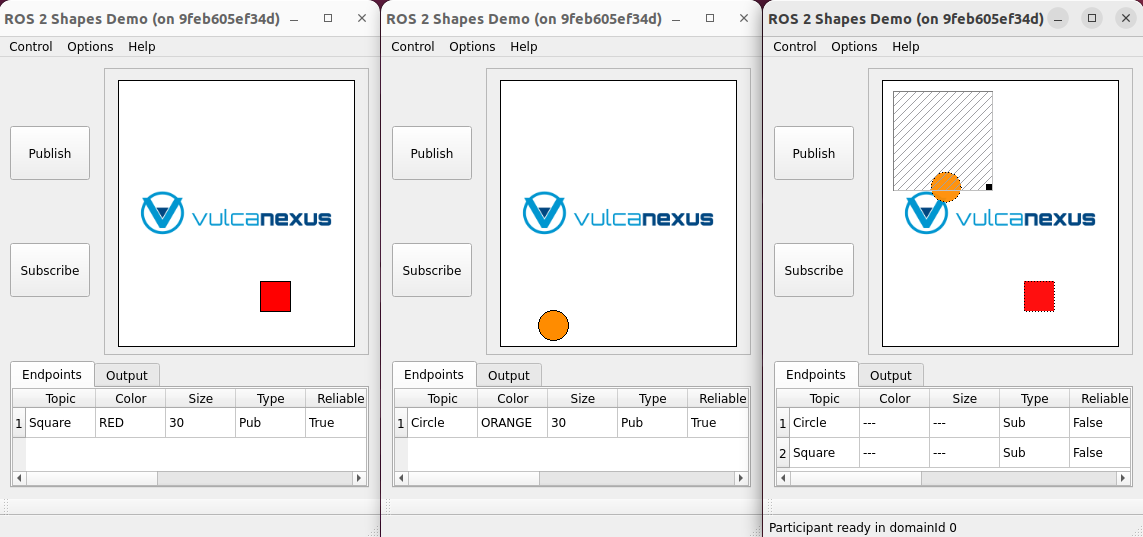
However, if the instance is in the rectangle, it is available for the subscriber..
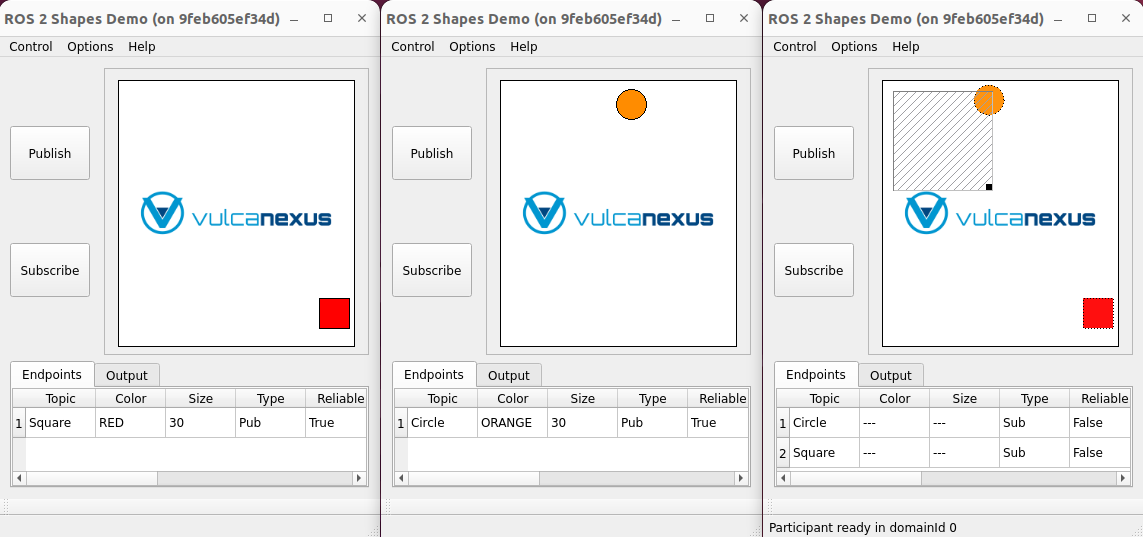
The rectangle is configurable, i.e. it can be resized and moved dynamically. The following images show examples of the content filter.
2.6.5. Next Steps
Visit ROS 2 Shapes Demo for more information on how to use this application.